
Something in My Brain Trying to Get Out
My sewing output this past week consisted of the following:
A set of regulation corn hole bean bags.
Two replacement quilted eyeglass cases, one for my mother and one for me.
One pillowcase.
Three hemmed pairs of jeans.
The bean bags were for Ali. She has family visiting and her dad made a corn hole board for them to use. I told her that I had a ton of canvas fabric scraps that I’d be happy to run up into a set of bean bags. She brought me the beans and I spent an hour one morning making bean bags on the industrial Necchi.
[Sometimes I offer to do these projects because I know I will learn something in the process, and I learned that regulation corn hole bean bags are 6” x 6” and filled with 15-16 oz of beans. I cut 7” x 7” squares (to allow for a 1/2” seam), got out the postal scale, and carefully filled each of them with 15 oz of beans before sewing shut.]
The eyeglass cases are ones that I’ve made before. My mother bought the original version at some kind of craft market years ago. The design is very clever but I have never seen a pattern for it anywhere. I reverse engineered the original and made one for each of us. She showed me, when we were in London, that hers was starting come apart. Mine was still serviceable, but dingy, and I decided that I would make a few more to see if I could improve upon the design. I think I now have it dialed in. I said to the husband that I am going to write up the pattern for sale—it would be my first sewing pattern—and he said, “Are you sure you want to go down that road again?”
[That sound you hear is the universe laughing.]
The pillowcase was for our renter’s daughter. She loves horses. I ran across some fabric in the stash and poof!—one pillowcase for a horse-obsessed three-year-old.
The jeans were the tall high-rise ones from Kohls. DD#1 helped me mark the hems when she was here last week and it was a matter of cutting off the excess fabric and re-sewing the hems. They are all done and ready to wear.
By Thursday, I could tell that there was something inside my head that really wanted to get out. The problem was that I had only the vaguest idea of what that something was. I knew it was a quilt, or at least a quilt block. I pulled some fabrics in an attempt to flesh out the idea but that didn’t help. I looked through Pinterest boards for quilt block ideas. After a week of fairly simple sewing, my brain wanted a challenge, but it wanted a technical challenge, not a “cut 96 tiny pieces of fabric for each block” challenge.
I spotted my (as-yet-unopened) Drunkard’s Path Accuquilt die in my sewing room and Brain yelled, “Yes! Let’s try that!” If you are unfamiliar with the Drunkard’s Path block, it is comprised of two curved pieces of fabric, one convex and one concave. The blocks can be put together in a variety of very interesting ways. (At the bottom of this Stitched by Crystal blog post, you can see 20 different layout variations she auditioned for her quilt.)
This is the Accuquilt die:

The darker colored foam indicates the shape of the piece to be cut. Buried within the foam are some very sharp blades. When the fabric is layered on top of the die and run through the press, the blades cut the appropriate shapes. It isn’t necessary to cover the entire die with fabric; I can lay a strip or square of fabric over just the piece(s) that I want to cut. On the first pass, I put white fabric over the right half of the die. On the second pass, I put a print fabric over the left half of the die. Eventually, I could probably cut all the pieces in one pass, but for the first couple of cuts, I wanted to do them separately.
And that gave me several sets that looked like this:
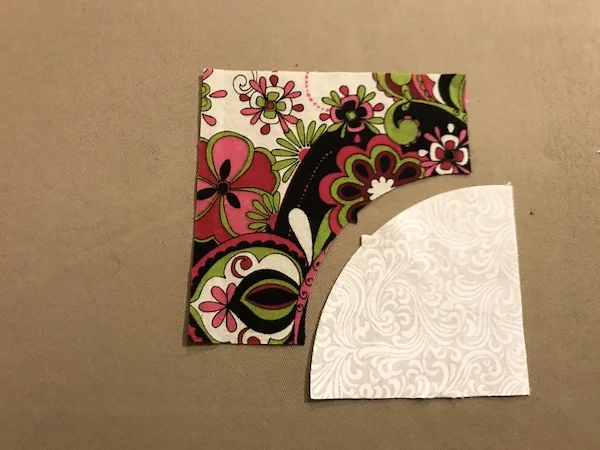
The die very helpfully cuts a small triangle in the center of each piece to help with matching. You might think that it would be relatively easy to sew those two pieces together, until you do this:

When you flip one piece up on top of the other for sewing, you have pieces going in opposite directions, which is not conducive to sewing a seam easily. (That thread in the bottom right corner of the picture is driving me nuts, by the way.)
Sewing curves is one of those sewing tasks held out to novice sewists as difficult and mysterious. Pfffttt. Sewing curves requires some care, but really, so does everything in sewing, and you ought to be sewing straight seams with as much attention as you give to sewing curved ones. The issue is that I don’t like to pin unless absolutely necessary. When I looked around the Internet for suggestions on putting these pieces together, I ran across a lot of tutorials that suggested to start with a pin at each end of the seam, one in the middle, and then “pin by halves” until the block looked like some kind of weird voodoo doll with two dozen pins sticking out of it. If I have to make several hundred of these for a quilt, there is no way I am going to pin the living daylights out of each block like that.
I found this blog post with a very helpful video that shows how to hold the two pieces as you feed them into the machine such that no pins are required. Yay! And it works:

I did trim up my blocks—these finish at 4-1/2”—as I do with all of my blocks, for accuracy. The bias edges on both pieces almost ensures that some stretching will happen no matter how carefully you sew. I didn’t have to trim much, just a few slivers on each side.
I want to play with the assembly of these blocks a bit more. I have several different presser feet for sewing 1/4” seams and I am curious to see which one of them works best when using the “sewing without pins” method. Will these blocks become a quilt? I am not sure. Ultimately, though, Brain was able to go to bed happy last night, having scratched this itch.
I also pulled out the pattern I intend to use for the fair apron, and today I’ll look through my stash of yardage for suitable fabric. I am going to make the Protect and Serve Apron from Decades of Style:

I made this apron once before and it’s my favorite to wear over dresses at church functions because it’s nice and long. It’s also got some technical details that are good for showing off sewing skills.