
Why 30 Degrees?
I pulled another length of yardage out of the stash and proceeded to cut an apron from the second draft of the pattern—the one from yesterday’s post. As I do each of these steps, I am making copious notes and taking many pictures, all while thinking about the best way to present this as a pattern that someone else could follow.
I don’t like to waste fabric. For all that I slice and dice a lot of fabric here, I try to be as economical with it as possible. (I am not a fan of fussy cutting for that very reason—it just wastes too much fabric.) I’ll often look at the layout of pattern pieces and try to figure out if I can get the same pieces from a smaller cut. I know why designers specify to purchase more fabric (or yarn) than is generally needed, though. We don’t want to be on the receiving end of angry e-mails informing us that the project was a flop because the amount of material specified in the pattern was insufficient and the manufacturer has discontinued it. In my knitting patterns, I almost always erred on the side of too much rather than not enough. (I did get the occasional knitter who e-mailed me to complain that she had a skein or two left over, as though I should be able to predict within 10-20 yards exactly how much yarn she would need for the size she was knitting.) Now I am trying to figure out the yardage requirements for this apron, which involves playing with the placement of the pattern pieces.
As I did that—stopping to compare my layout to the layout of the Protect and Serve apron—I noticed that the back yoke pieces for the P&S apron were cut on the bias in two pieces and seamed together rather than being cut on the fold as one piece. But when I looked closer, I discovered that they weren’t cut on the 45-degree bias, which is what I would have expected.
Pattern pieces usually have the grainline marked on them. This is a line that shows the direction of the lengthwise grain of the fabric, or the direction in which the warp threads are running. When placing pattern pieces for cutting, the grainline needs to be aligned with the lengthwise grain of the fabric so that the pattern piece, when it is sewn into the garment, hangs properly and doesn’t twist around the body. For most pattern pieces, the grainline marking runs straight up and down.
Sometimes, however, the grainline marking will run diagonally across the pattern piece, which indicates that that piece is to be cut on the bias. Cutting pattern pieces on the bias allows for some interesting visual effects (think stripes meeting as a chevron at the side seam of a skirt) and also allows for some internal stretching of the fabric (as in the neck binding of a knit shirt, to allow it to expand enough to go over the wearer’s head). Conversely, a piece of fabric cut on the lengthwise grain won’t stretch much at all, which is why quilt borders are often cut on the lengthwise grain to minimize waviness of the edges of the quilt.
Perhaps the back yoke pieces were cut on the bias to allow for some stretching in that area, but why not just cut them on the true bias? I got out my quilting ruler to see if I could figure out the exact angle at which these pieces tilt. Quilting rulers have helpful 30-, 45-, and 60-degree lines on them because quilt blocks involve a lot of geometry and it’s handy to have those markings. When I moved the ruler around on the yoke piece of the P&S apron, I discovered that the piece was tilted at a 30-degree angle (I marked the 30-degree line on the ruler and the grainline marking on the pattern piece in red to make it easier to see that the lines are parallel):

The next question was, “Why a 30-degree angle?” I chewed on that for a while and made the husband stand in front of me while I traced angles on his back. (He does try to be helpful, and he’s a builder, so I thought maybe he would have some great insight that I was missing.) I came up with three possible explanations:
“I wanted a bit of stretch in that area, but not as much stretch as I would get if I cut the piece on a 45-degree angle.”
“I copied this apron pattern from one that my grandmother gave me on old newsprint and that’s how she laid it out.”
“I had a limited amount of fabric and turning that pattern piece slightly was the only way I could fit it onto the fabric.”
The husband said he thought #3 was the likeliest explanation, given that historically, most people worked with what they had (which is why the ties for these vintage aprons are often cut right on the selvedge so that edge doesn’t have to be finished). Explanation #3 would also explain Explanation #2.
Google was no help, and I never took home ec, so I don’t have any formal education in this area. If anyone has a definitive answer to this question, please let me know, because it’s driving me slightly nuts. (The husband said to me, “Don’t overanalyze it,” which I thought was really funny coming from someone who doesn’t build anything unless he has looked at it from every possible angle to make sure he’s not missing anything. Pot, meet kettle.)
This is the layout I ended up with, using just over a yard of fabric before cutting the ties:
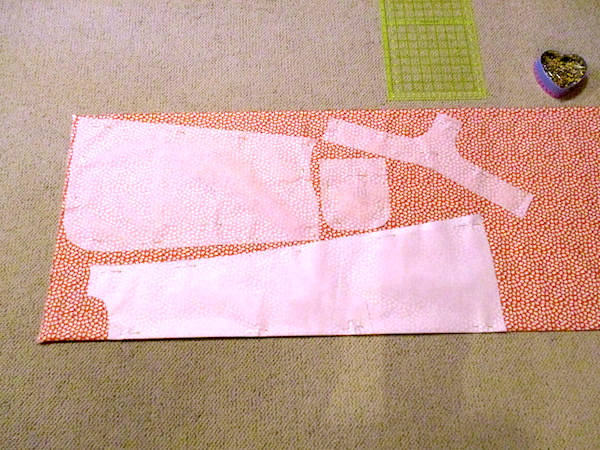
Astute readers will note that the side pieces are laid out upside down, or in the opposite direction from the front. I can get away with that because this is a non-directional print, and a busy one at that. No one is going to notice the difference in orientation. Were I to cut this from a directional print, however, I would have to make sure that those pieces were oriented in the same direction, or the print on the side pieces would be upside down.
I’ve got the pockets bound and attached to the front, the yoke seamed together at the center back and sewn to the front, and the neck opening bound. (The print is an overall orange with some tiny spots of navy blue, so I’m using navy blue binding.) I’m ready to bind the top of the side pieces and proceed on. This version may end up being my fair entry. I am pretty sure that I am going to have to make yet another version in which I lengthen the yoke and/or front strap areas. While my dress form is about the same size that I am, I forgot that it’s not quite as long in the torso.
*************************************************************
Every season I think to myself, “We only need about four or five zucchini plants,” and every season, WITHOUT FAIL, we end up with 12-15 plants in the garden. I am convinced it is some kind of conspiracy. I’ve already picked a dozen medium-sized ones, several of which went to the chickens and two of which went into the zucchini bread. The rest are going to get made into stuffed zucchini boats for dinner tonight. I went out yesterday morning and cut off about 10 baby zucchinis—ones in the 3”-5” range—and sent them over to my friend Anna, the caterer. She and her husband like to grill the small ones. I’ll do whatever I can to keep the zucchini tsunami at bay.
We’re also going to have a lot of pumpkins. I don’t really need anymore pumpkins but I planted them anyway. However, this is a different—and clearly more prolific—variety than what I’ve grown in the past. I used to do Cinderella and this one is a variety called Small Sugar. Perhaps I should open a vegetable stand in the front yard.